基于Docker搭建机器学习环境

基于Docker搭建机器学习环境


背景

最近一年在学习机器学习相关内容,发现机器学习发展太快,初学者在学习过程中会遇到各种环境依赖的问题,部分初学者Linux能力有限,配置的环境可能会出各种各样玄学的问题,另外模型都比较大,并且现在hugging face还被墙,需要一种折中的方式,提供基础的环境,支持cuda等,简单配置一下即可使用并且支持缓冲,减少网络压力等,最终确定,牺牲一些性能,使用docker的形式来搭建机器学习环境。

相关介绍

nvidia docker tag说明

CUDA image有三种风格,可以通过NVIDIA公共集线器存储库获得。
base: 从CUDA 9.0开始,包含了部署预构建CUDA应用程序的最低限度(libcudart)。 如果你想手动选择你想要安装的CUDA包,请使用这个映像。
runtime: 通过添加CUDA工具包中的所有共享库扩展基本映像。 如果您有一个使用多个CUDA库的预构建应用程序,请使用此图像。
devel: 通过添加编译器工具链、调试工具、头文件和静态库来扩展运行时映像。 使用这个图像从源代码编译一个CUDA应用程序。

准备

  • 良好网络
  • 服务器+N卡
  • Linux环境,我这里是Ubuntu 22.10
  • 已安装docker和docker-compose

安装

nvidia-container-tools 安装

以下是nvidia官方脚本,最高支持ubuntu22.04,

1
2
3
4
5
distribution=$(. /etc/os-release;echo $ID$VERSION_ID) \\
&& curl -fsSL <https://nvidia.github.io/libnvidia-container/gpgkey> | sudo gpg --dearmor -o /usr/share/keyrings/nvidia-container-toolkit-keyring.gpg \\
&& curl -s -L <https://nvidia.github.io/libnvidia-container/$distribution/libnvidia-container.list> | \\
sed 's#deb https://#deb [signed-by=/usr/share/keyrings/nvidia-container-toolkit-keyring.gpg] https://#g' | \\
sudo tee /etc/apt/sources.list.d/nvidia-container-toolkit.list

我这里是ubuntu 22.10,手动修改如下,也是可以的

1
2
3
4
5
distribution=ubuntu22.04 \\
&& curl -fsSL <https://nvidia.github.io/libnvidia-container/gpgkey> | sudo gpg --dearmor -o /usr/share/keyrings/nvidia-container-toolkit-keyring.gpg \\
&& curl -s -L <https://nvidia.github.io/libnvidia-container/$distribution/libnvidia-container.list> | \\
sed 's#deb https://#deb [signed-by=/usr/share/keyrings/nvidia-container-toolkit-keyring.gpg] https://#g' | \\
sudo tee /etc/apt/sources.list.d/nvidia-container-toolkit.list

执行安装命令:

1
2
sudo apt update 
sudo apt install -y nvidia-container-toolkit

重启容器:

1
sudo systemctl restart docker

测试是否安装成功:

1
docker run --rm --gpus all nvidia/cuda:12.0.1-devel-ubuntu22.04 nvidia-smi

nvidia-container-toolkit 安装成功

配置镜像

镜像功能介绍:

  • 提供cuda环境
  • 安装基础依赖,python环境,部分个人感觉是必须的工具
  • 安装ssh server,可以远程管理,密码为P@ssw0rd!,各位自行修改即可

Dockerfile如下:

1
2
3
4
5
6
7
8
9
10
11
12
13
14
15
16
17
18
19
20
21
22
23
24
25
26
27
28
29
30
31
32
33
34
FROM nvidia/cuda:11.8.0-devel-ubuntu22.04

ENV TZ="Asia/shanghai"
ENV LANG="en_US.utf8"

# config apt sources.list
RUN sed -i 's/archive.ubuntu.com/mirrors.ustc.edu.cn/g' /etc/apt/sources.list

# cuda
RUN sed -i 's/developer.download.nvidia.com/developer.download.nvidia.cn/g' /etc/apt/sources.list.d/cuda-ubuntu2204-x86_64.list

RUN apt update \
&& apt install -y gcc g++ python3 python3-pip ssh net-tools vim git proxychains ninja-build rsync htop nvtop nload lrzsz tmux \
&& apt autoclean \
&& rm -rf /var/lib/apt/lists/* /tmp/* /var/tmp/*

RUN env > /etc/environment

RUN ln -sf /usr/bin/python3 /usr/bin/python

RUN /usr/bin/pip config set global.index-url https://mirrors.ustc.edu.cn/pypi/web/simple

RUN /usr/bin/pip install pythonenv

WORKDIR /data

# ssh
RUN mkdir /var/run/sshd
# change root password
RUN echo 'root:P@ssw0rd!' | chpasswd
RUN sed -i 's/#PermitRootLogin prohibit-password/PermitRootLogin yes/g' /etc/ssh/sshd_config
EXPOSE 22

CMD ["/usr/sbin/sshd","-D"]

docker-compose.yaml如下:

1
2
3
4
5
6
7
8
9
10
11
12
13
14
15
16
17
18
19
20
21
22
23
24
25
26
27
28
29
30
31
32
version: '3'

services:

dl-env:
build: ./
image: hksanduo/deeplearn-env:latest
container_name: deeplearn-env
#command: nvidia-smi
deploy:
resources:
reservations:
devices:
- driver: nvidia
count: 2
capabilities: [gpu]
ports:
- "40022:22"
- "40080:80"
volumes:
- ../models:/data/models
- ../project:/data/project
- ../cache:/root/.cache
- ../anaconda3:/root/anaconda3
networks:
- dl
restart: always

networks:
dl:
driver: bridge

以上环境中映射了两个端口,一个是80,一个是22,22是方便ssh管理,80是方便把容器中的服务映射出来,各位可以根据自己的需求进行映射,由于conda是需要手动安装的,得自行下载安装包,默认安装目录是/root/anaconda3,这里映射出来了,以后可以直接用,并且conda的虚拟环境也可以进行拷贝使用,比较方便。

这里是把Dockerfile和docker-compose.yaml放在一个目录,方便构建,映射的目录在上一级目录,这么做的好处是减少在构建过程中扫描文件消耗的时间。

执行以下命令进行构建和运行

1
2
docker-compose build
docker-compose up -d

自行验证以下,是否启动成功

docker-compose高级配置

说明:
1、由于我已经安装过conda,这里直接在其他机器上拷贝conda目录,不用每次都安装,在容器中映射conda目录就行
2、各位可以把conda理解成jdk,配置以下环境变量就可以运行,但是conda把环境变量写到了用户目录下的.bashrc中,我这里懒得折腾,直接映射了.bashrc,仅供参考。
3、conda可以配置国内的镜像源,比如tsinghua tuna和ustc,有个问题就是镜像同步会有延迟,可能最新的包并不存在,各位在遇到这个问题需要注意,这里就不提供.condarc配置文件。
4、尽可能有个网络不错的梯子,个人建议

配置如下:

1
2
3
4
5
6
7
8
9
10
11
12
13
14
15
16
17
18
19
20
21
22
23
24
25
26
27
28
29
30
31
32
version: '3'

services:

dl-env:
build: ./
image: hksanduo/deeplearn-env:latest
container_name: deeplearn-env
#command: nvidia-smi
deploy:
resources:
reservations:
devices:
- driver: nvidia
count: 2
capabilities: [gpu]
ports:
- "40022:22"
- "40080:80"
volumes:
- ../models:/data/models
- ../project:/data/project
- ../cache:/root/.cache
- ../anaconda3:/root/anaconda3
- ../.bashrc:/root/.bashrc
networks:
- dl
restart: always

networks:
dl:
driver: bridge

.bashrc如下:

1
2
3
4
5
6
7
8
9
10
11
12
13
14
15
16
17
18
19
20
21
22
23
24
25
26
27
28
29
30
31
32
33
34
35
36
37
38
39
40
41
42
43
44
45
46
47
48
49
50
51
52
53
54
55
56
57
58
59
60
61
62
63
64
65
66
67
68
69
70
71
72
73
74
75
76
77
78
79
80
81
82
83
84
85
86
87
88
89
90
91
92
93
94
95
96
97
98
99
100
101
102
103
104
105
106
107
108
109
110
111
112
113
114
115
116
117
118
119
120
121
122
123
124
125
126
127
128
129
130
131
132
133
134
135
136
137
138
139
140
141
142
143
144
145
# ~/.bashrc: executed by bash(1) for non-login shells.
# see /usr/share/doc/bash/examples/startup-files (in the package bash-doc)
# for examples

# If not running interactively, don't do anything
[ -z "$PS1" ] && return

# don't put duplicate lines in the history. See bash(1) for more options
# ... or force ignoredups and ignorespace
HISTCONTROL=ignoredups:ignorespace

# append to the history file, don't overwrite it
shopt -s histappend

# for setting history length see HISTSIZE and HISTFILESIZE in bash(1)
HISTSIZE=1000
HISTFILESIZE=2000

# check the window size after each command and, if necessary,
# update the values of LINES and COLUMNS.
shopt -s checkwinsize

# make less more friendly for non-text input files, see lesspipe(1)
[ -x /usr/bin/lesspipe ] && eval "$(SHELL=/bin/sh lesspipe)"

# set variable identifying the chroot you work in (used in the prompt below)
if [ -z "$debian_chroot" ] && [ -r /etc/debian_chroot ]; then
debian_chroot=$(cat /etc/debian_chroot)
fi

# set a fancy prompt (non-color, unless we know we "want" color)
case "$TERM" in
xterm-color) color_prompt=yes;;
esac

# uncomment for a colored prompt, if the terminal has the capability; turned
# off by default to not distract the user: the focus in a terminal window
# should be on the output of commands, not on the prompt
#force_color_prompt=yes

if [ -n "$force_color_prompt" ]; then
if [ -x /usr/bin/tput ] && tput setaf 1 >&/dev/null; then
# We have color support; assume it's compliant with Ecma-48
# (ISO/IEC-6429). (Lack of such support is extremely rare, and such
# a case would tend to support setf rather than setaf.)
color_prompt=yes
else
color_prompt=
fi
fi

if [ "$color_prompt" = yes ]; then
PS1='${debian_chroot:+($debian_chroot)}\[\033[01;32m\]\u@\h\[\033[00m\]:\[\033[01;34m\]\w\[\033[00m\]\$ '
else
PS1='${debian_chroot:+($debian_chroot)}\u@\h:\w\$ '
fi
unset color_prompt force_color_prompt

# If this is an xterm set the title to user@host:dir
case "$TERM" in
xterm*|rxvt*)
PS1="\[\e]0;${debian_chroot:+($debian_chroot)}\u@\h: \w\a\]$PS1"
;;
*)
;;
esac

# enable color support of ls and also add handy aliases
if [ -x /usr/bin/dircolors ]; then
test -r ~/.dircolors && eval "$(dircolors -b ~/.dircolors)" || eval "$(dircolors -b)"
alias ls='ls --color=auto'
#alias dir='dir --color=auto'
#alias vdir='vdir --color=auto'

alias grep='grep --color=auto'
alias fgrep='fgrep --color=auto'
alias egrep='egrep --color=auto'
fi

# some more ls aliases
alias ll='ls -alF'
alias la='ls -A'
alias l='ls -CF'

# Alias definitions.
# You may want to put all your additions into a separate file like
# ~/.bash_aliases, instead of adding them here directly.
# See /usr/share/doc/bash-doc/examples in the bash-doc package.

if [ -f ~/.bash_aliases ]; then
. ~/.bash_aliases
fi

# enable programmable completion features (you don't need to enable
# this, if it's already enabled in /etc/bash.bashrc and /etc/profile
# sources /etc/bash.bashrc).
#if [ -f /etc/bash_completion ] && ! shopt -oq posix; then
# . /etc/bash_completion
#fi

export PATH=/root/anaconda3/bin:$PATH

# >>> conda initialize >>>
# !! Contents within this block are managed by 'conda init' !!
__conda_setup="$('/root/anaconda3/bin/conda' 'shell.bash' 'hook' 2> /dev/null)"
if [ $? -eq 0 ]; then
eval "$__conda_setup"
else
if [ -f "/root/anaconda3/etc/profile.d/conda.sh" ]; then
. "/root/anaconda3/etc/profile.d/conda.sh"
else
export PATH="/root/anaconda3/bin:$PATH"
fi
fi
unset __conda_setup
# <<< conda initialize <<<


# JINA_CLI_BEGIN

## autocomplete
_jina() {
COMPREPLY=()
local word="${COMP_WORDS[COMP_CWORD]}"

if [ "$COMP_CWORD" -eq 1 ]; then
COMPREPLY=( $(compgen -W "$(jina commands)" -- "$word") )
else
local words=("${COMP_WORDS[@]}")
unset words[0]
unset words[$COMP_CWORD]
local completions=$(jina completions "${words[@]}")
COMPREPLY=( $(compgen -W "$completions" -- "$word") )
fi
}

complete -F _jina jina

# session-wise fix
ulimit -n 4096
export OBJC_DISABLE_INITIALIZE_FORK_SAFETY=YES
# default workspace for Executors

# JINA_CLI_END

我直接使用了代理,.condarc可以参考以下:

1
2
3
4
5
6
7
8
9
10
11
12
13
14
15
16
17
channels:
- defaults
show_channel_urls: true
default_channels:
- https://mirrors.tuna.tsinghua.edu.cn/anaconda/pkgs/main
- https://mirrors.tuna.tsinghua.edu.cn/anaconda/pkgs/r
- https://mirrors.tuna.tsinghua.edu.cn/anaconda/pkgs/msys2
- https://mirrors.tuna.tsinghua.edu.cn/anaconda/cloud/pytorch/
custom_channels:
conda-forge: https://mirrors.tuna.tsinghua.edu.cn/anaconda/cloud
msys2: https://mirrors.tuna.tsinghua.edu.cn/anaconda/cloud
bioconda: https://mirrors.tuna.tsinghua.edu.cn/anaconda/cloud
menpo: https://mirrors.tuna.tsinghua.edu.cn/anaconda/cloud
pytorch: https://mirrors.tuna.tsinghua.edu.cn/anaconda/cloud
pytorch-lts: https://mirrors.tuna.tsinghua.edu.cn/anaconda/cloud
simpleitk: https://mirrors.tuna.tsinghua.edu.cn/anaconda/cloud
auto_activate_base: false

构建命令同上即可

错误

Failed to initialize NVML: Unknown Error

现象就是在容器中使用nvidia-smi也找不到显卡。

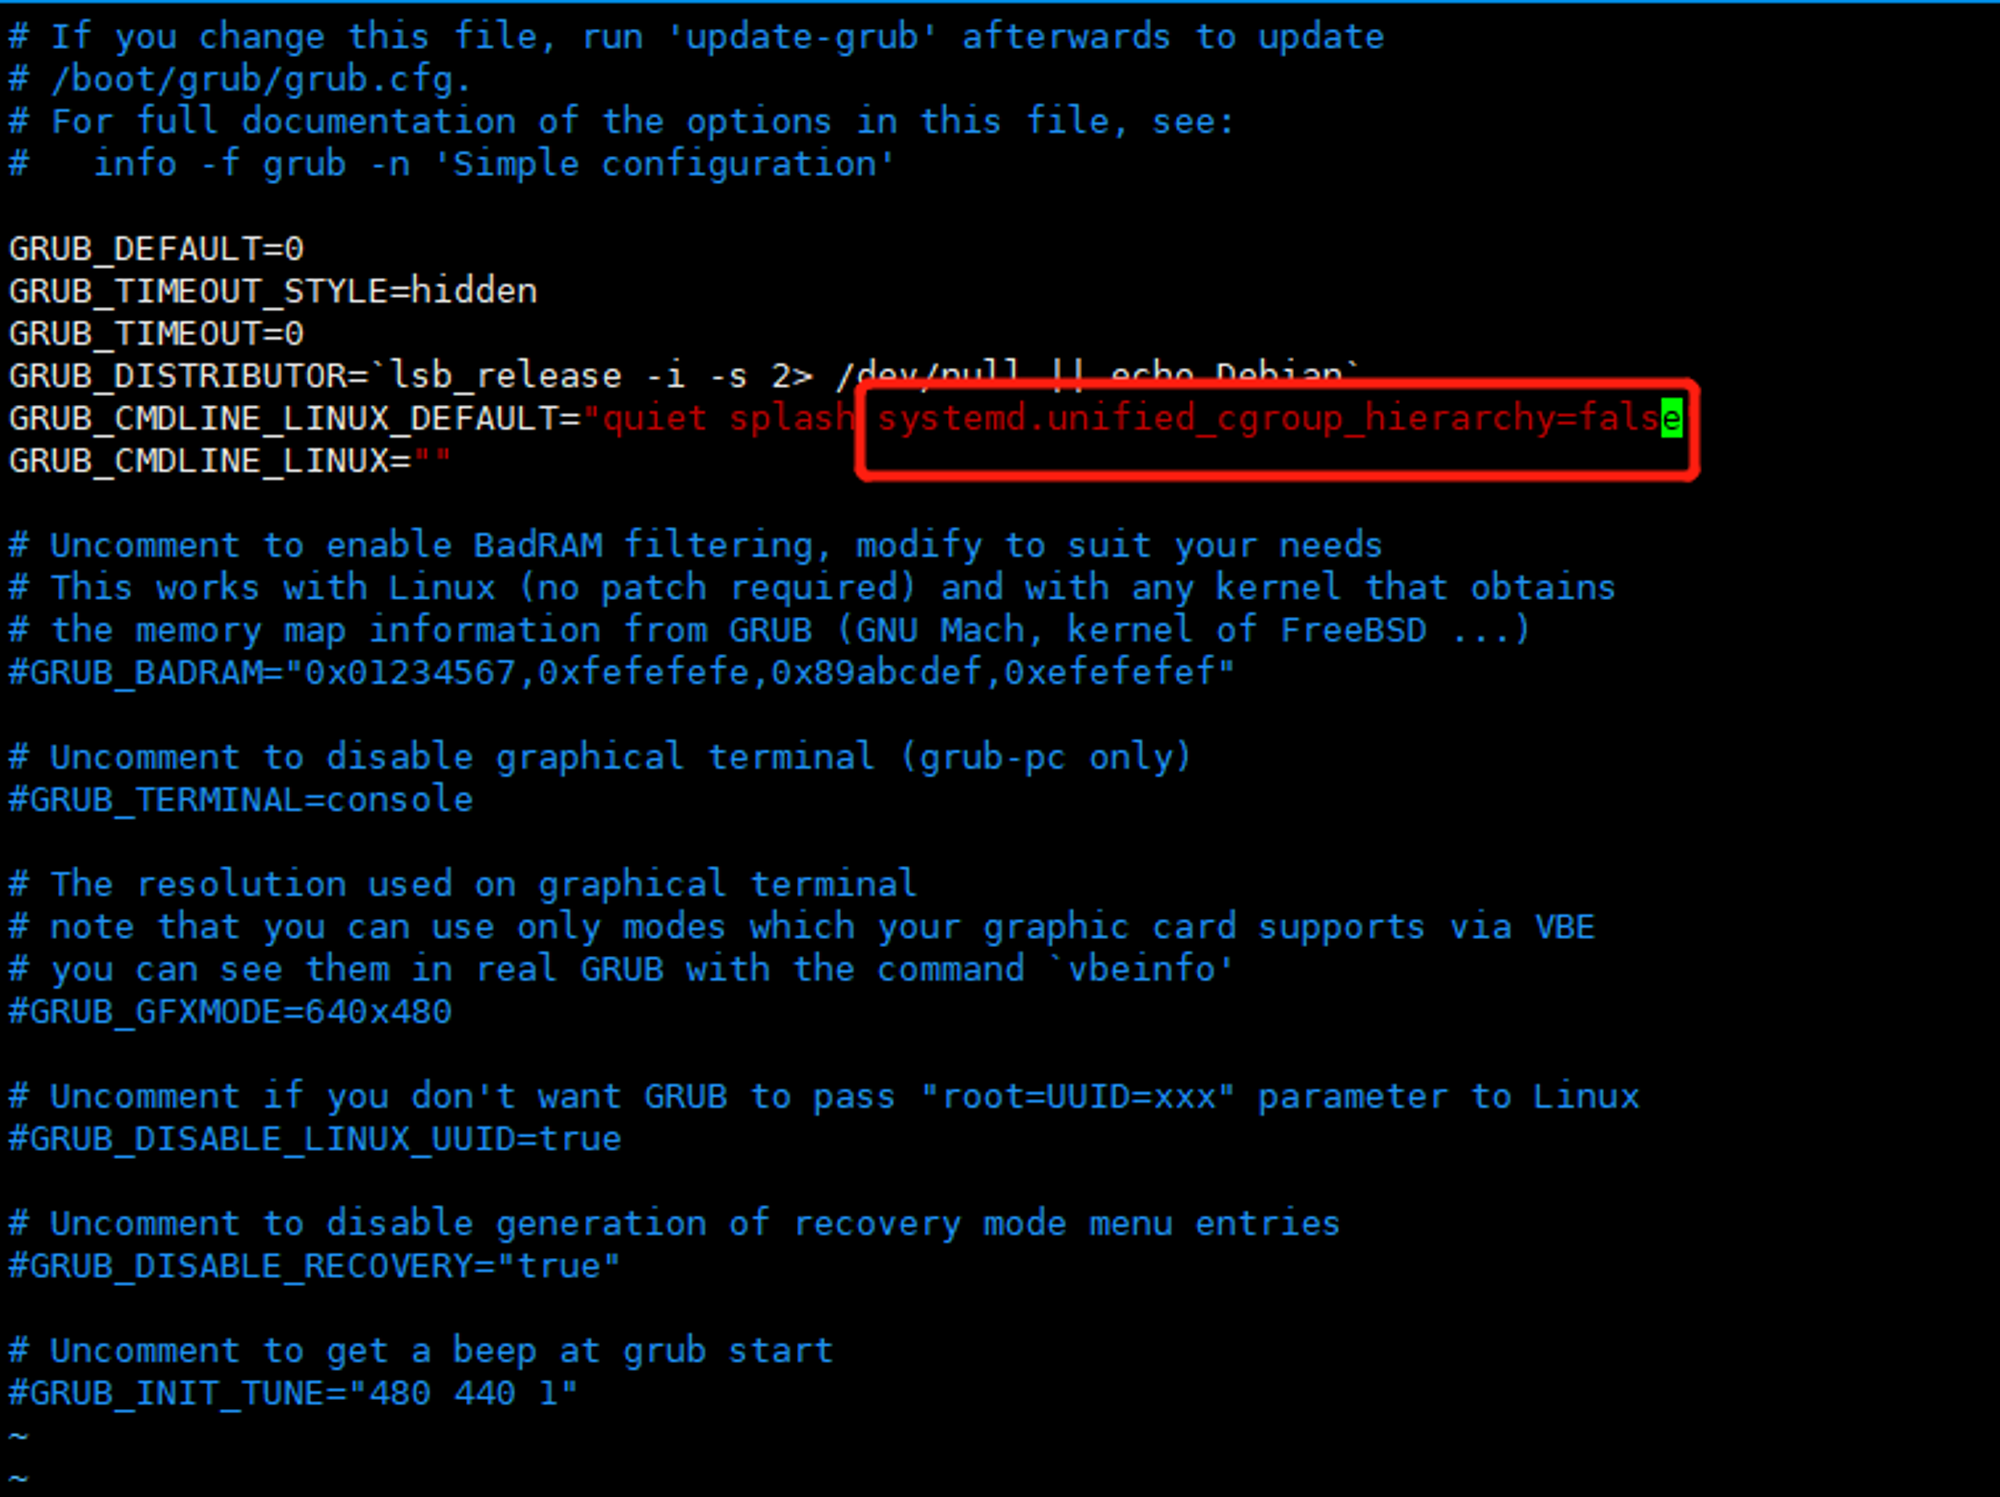
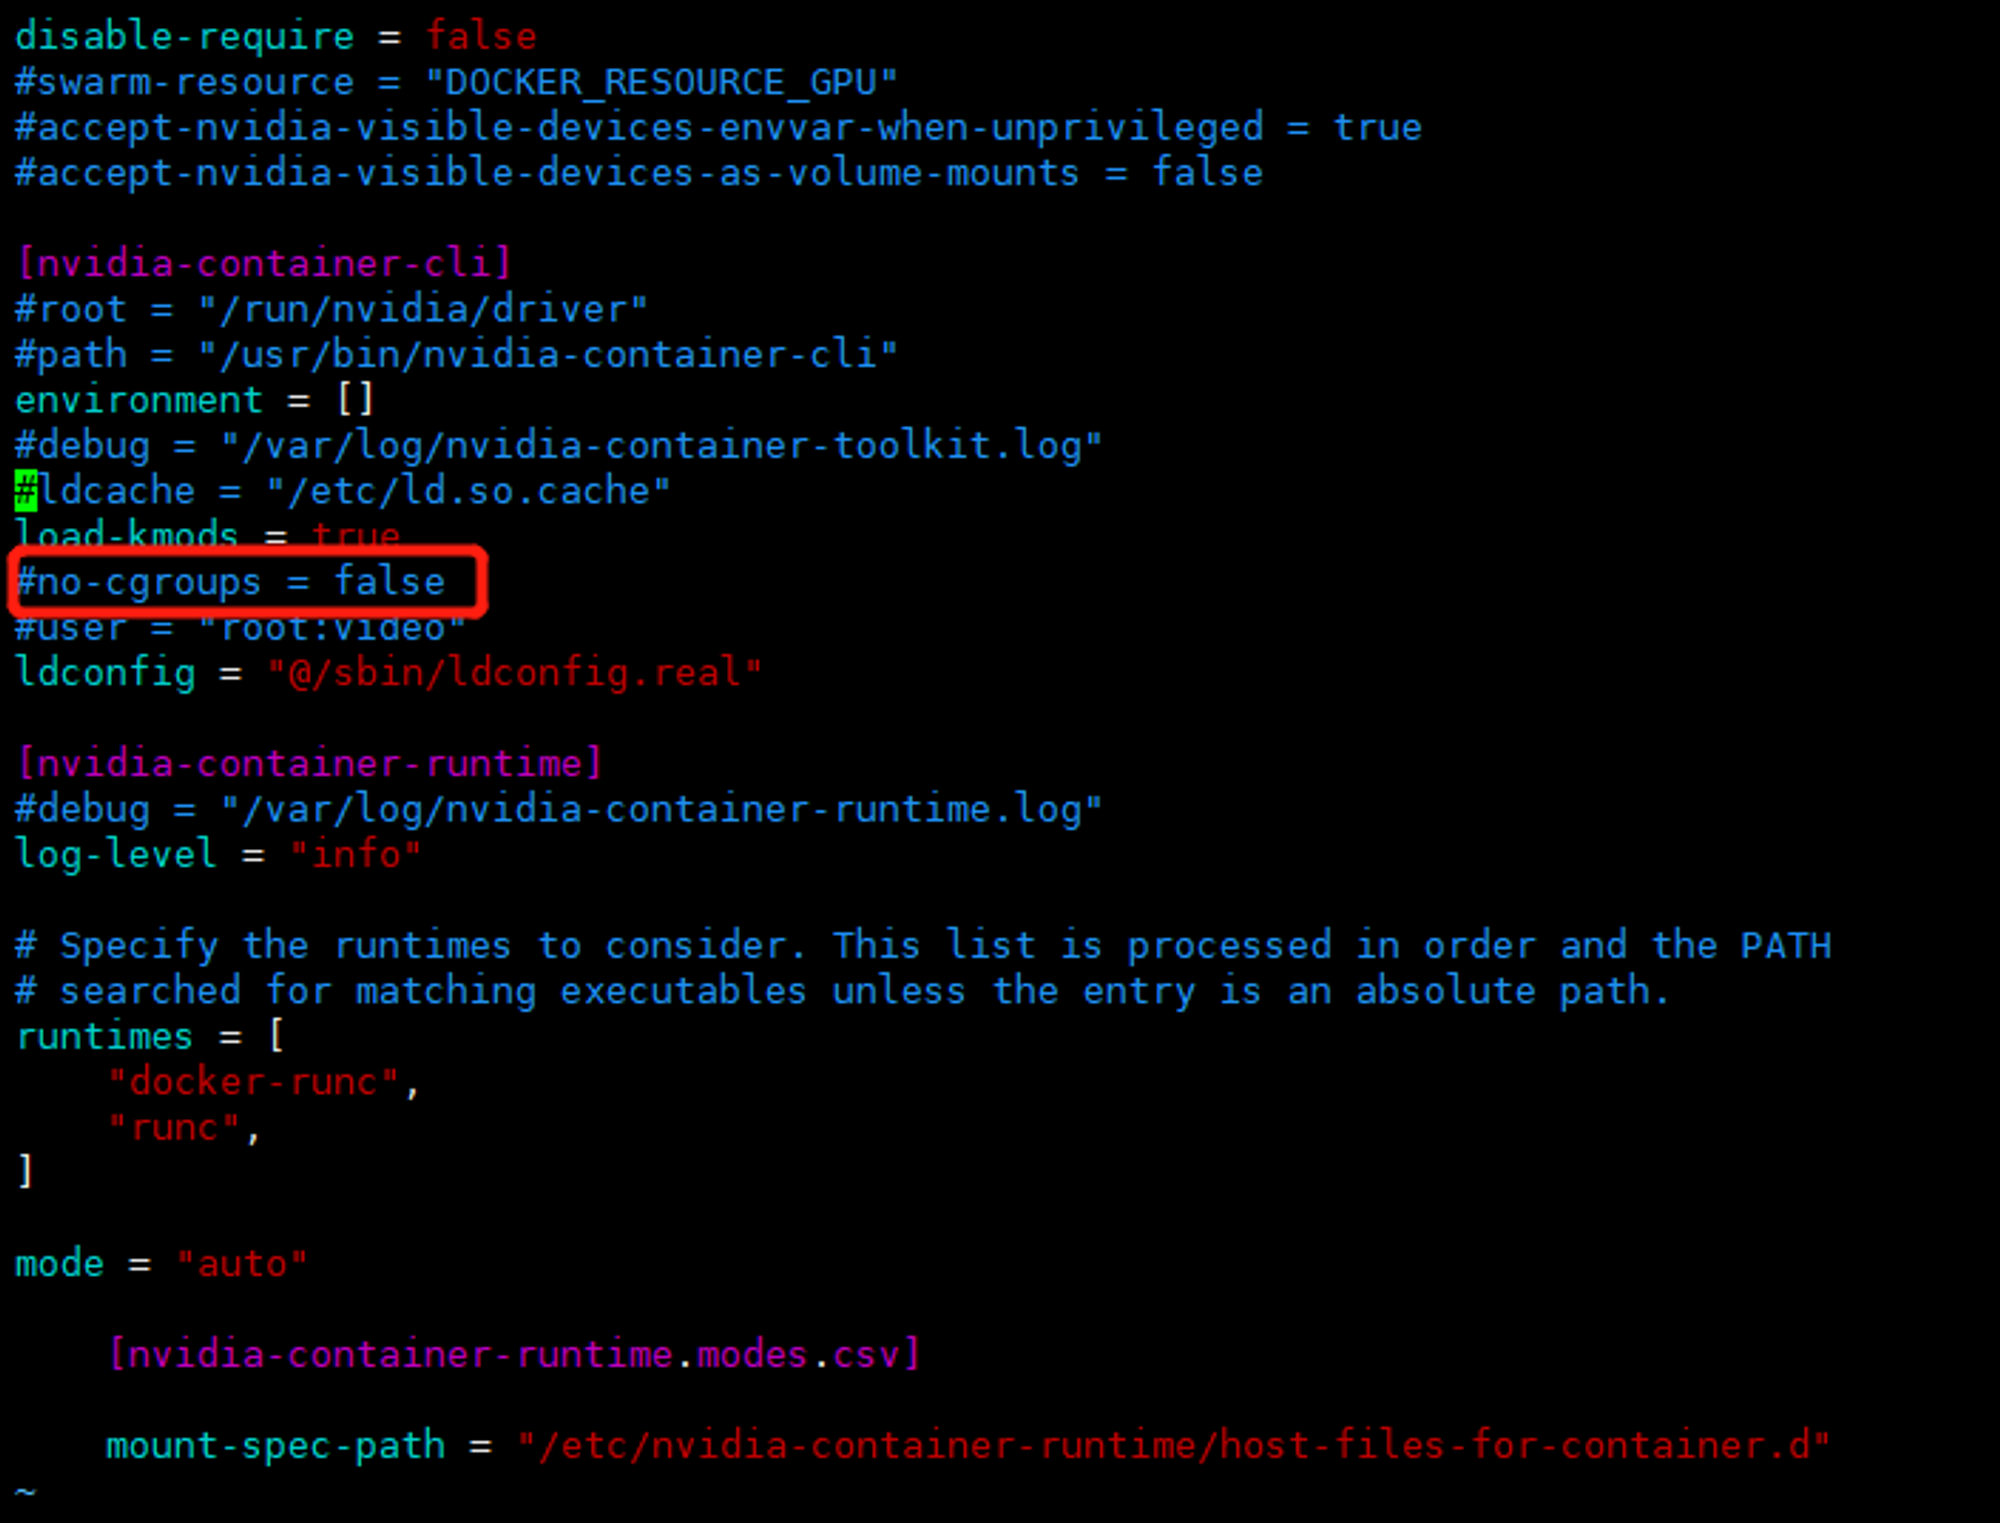
Note: libnvidia-containerAUR has no support for cgroups v2. You need to set the systemd.unified_cgroup_hierarchy=false kernel parameter and set no-cgroups = false in /etc/nvidia-container-runtime/config.toml if you are using systemd v248 or higher.

执行 systemctl –version 查看 systemd 版本,如果是 v248 或更高则可确认是该问题:
 systemd version

需要做的有:

  • 添加内核参数 systemd.unified_cgroup_hierarchy=false
  • /etc/nvidia-container-runtime/config.toml 修改参数 no-cgroups = false

其中内核参数修改方法(GRUB)为:编辑 /etc/default/grub,在 GRUB_CMDLINE_LINUX_DEFAULT 参数双引号内加上所需参数:GRUB_CMDLINE_LINUX_DEFAULT="... systemd.unified_cgroup_hierarchy=false",再执行 grub-mkconfig -o /boot/grub/grub.cfg 生成启动引导配置文件。然后重启电脑,执行 cat /proc/cmdline 确认参数已添加。
 grub

执行以下命令,更新grub

1
sudo grub-mkconfig -o /boot/grub/grub.cfg

取消该注释:

config.toml

注意:这个错误有个玄学的问题,重启容器也能解决

Cannot start service dl-env: could not select device driver “nvidia” with capabilities: [[gpu]]

这个错误是由于未安装nvidia-container-toolkit或者安装完成后未重启docker导致的

总结

个人的一些小技巧,总结以下:
1、稳定的梯子
2、conda可能会安装CPU版本,在安装过程中一定确定安装列表,出现CPU版本,直接退出安装,安装完也没法用,浪费时间。
3、个人比较习惯使用conda建立虚拟环境,使用pip安装依赖
4、conda目录是可以相互拷贝的,最主要的是里面的envs的环境也是可以拷贝使用的
5、局域网基本上都是千兆或者万兆的,百兆就别玩了,太浪费时间,使用rsync同步模型和数据,比较方便
6、使用tmux,方便后台执行,注意需要区分和conda 加载虚拟环境的顺序,先使用tmux 创建并进入session,然后使用conda activate {env} 激活环境
7、linux代理,建议直接使用配置环境的方式配置代理 export https_proxy={proxy server} ,这里主要是方便git-lfs下载hugging face模型,使用proxychains对git-lfs无效。

参考


本博客所有文章除特别声明外,均采用 CC BY-SA 4.0 协议 ,转载请注明出处!